- 11.11.2019 /
- Advent decoration /
- DIY
Natural-rustic eye-catcher: Poinsettia in a cone pot
The contrast between these cream-coloured poinsettias and their decorative pine-cone planter couldn’t be more appealing. A natural and rustic eye-catcher for the Christmas season that anyone can make in just a few steps. Two middle-sized poinsettias, a plastic container in the right size, pine cones of similar length, gold wire and hot glue are all you need to make this arrangement.

Here’s how it’s done:
Hot-glue the cones to the outsides of the pot, keeping the gaps as small as possible. The best way to do this is to place every other cone pointing in the opposite direction. To add a festive accent, wrap thin gold wire several times around the pine-cone planter.
As a final step, position the poinsettias in the pine-cone planter. Now your natural and rustic eye-catcher for Christmas is done.


")
Eye-catcher in funky colours: Mini arrangement with a cut poinsettia
Presentation with power: In the gaily-coloured mini arrangement in the foreground, holly and switch grass help put a cut poinsettia in the spotlight. The brightly-coloured floral foam cubes in the simple glass vase make this unusual deco idea perfect.
Tip: For the greatest possible impact do up several of these and present them in a group.

If you want to make this colourful deco idea, you will need: a poinsettia plant, glass vase, switch grass (Panicum elegans ‘Frosted Explosion’), sprigs of holly and coloured floral foam cubes.
And here’s how it’s done:
Soak the floral foam cubes in water for about five minutes until they are fully saturated. Then fill 2/3 of the glass vase with coloured floral foam cubes. Insert the switch grass, holly and cut poinsettia. Done!


Tip: The poinsettia will stay beautiful for up to two weeks if the stems are sealed immediately after cutting. To do this, dip the stem in approx. 60°C water for a few seconds, then in cold water.
Festive and elegant eye-catcher: Cut poinsettias in a parchment paper vase
All those who are creative and value elegance will love this stylish DIY arrangement with white and cream-coloured cut poinsettias in a glass vase covered with parchment paper.

To make it, you will need white and cream-coloured poinsettias, a glass vase, parchment paper, paste, birch branches, lunaria inflorescence, dried grasses, glass tubes and a Christmas bauble. Additionally, a vase, rubber gloves, pruning shears and a knife.
And here’s how it’s done:
Steps 1 and 2: Tear parchment paper into squares. Upend the glass vase and place it on a second vase or similar object. Next, brush paste on the pieces of paper and stick them to the glass vase, beginning at the bottom, until it is covered to the rim.
Step 3: Cut the lunaria and grasses to the desired length and attach with additional parchment paper around the vase. Trim the birch twigs as well and arrange them in the vase without water. Next, insert the glass tubes in the spaces and fill them with water.


Step 4: Cut individual stems off the poinsettia plant and remove the lower leaves. Then cut the stems at an angle and seal the ends by dipping them first in approx. 60°C water for a few seconds, then in cold water. Now arrange the cut poinsettias in the glass tubes.
Step 5: Finish off the arrangement with lunaria, Christmas baubles and dried grasses. Done! Tip: As long as the glass tubes are refilled with fresh water from time to time, this poinsettia decoration will stay beautiful for up to two weeks.
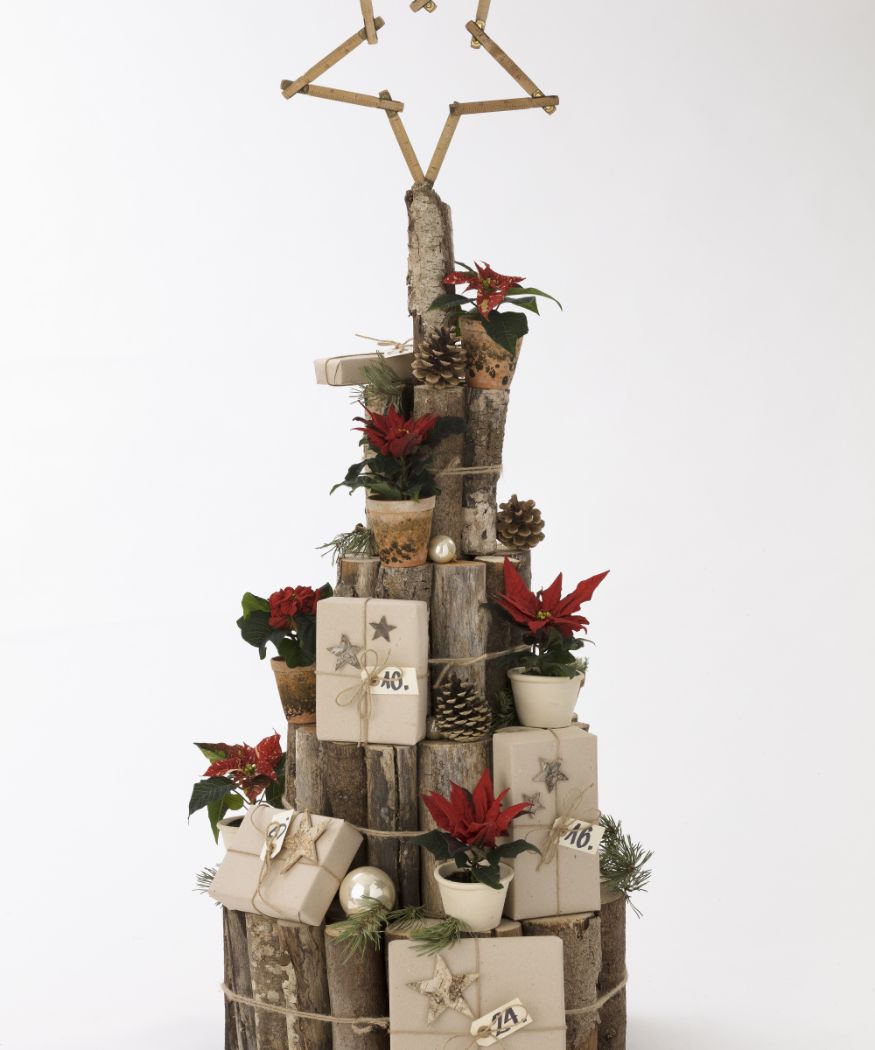
Original combination: Advent calendar / Christmas tree with poinsettias
This little DIY tree made of bundled logs is a Christmas tree and Advent calendar in one. Red poinsettia miniatures, decoratively wrapped Advent calendar packages and a measuring stick folded into the shape of a large star turn this tree into an original eye-catcher for the Christmas season. And on Christmas Eve, when all the packages have been opened, the tree offers ample space for additional decorations.

You will need: approx. 70 same-length fairly straight logs, sturdy rope, six to eight poinsettia miniatures in planter pots, Advent calendar packages, cones, pine greens, baubles and a folding measuring stick.
And here's how it's done:
First, arrange the logs in four circular groups of different sizes and wind ropes around the outsides to bind them together securely. Next, stack the bundles on top of one another to make a Christmas tree shape. A single log on the top serves as the crown. For improved stability, it should be glued or screwed together. Once the tree is built, fold the measuring stick into a star shape and hot-glue it to the “crown” of the tree.


Arrange the poinsettia miniatures, baubles, cones, pine greens and Advent calendar packages on the different tree levels. Done!
no active widgets